|
Click on START then CONTROL PANEL
then NETWORK CONNECTIONS
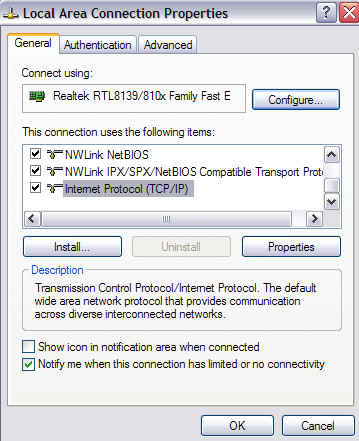
Right click on your net work connection then click PROPERTIES
Scroll down until you see the Internet Protocol (TCP/IP) option and
highlight it. Then click on the PROPERTIES button.
|
This is what you should see:
 |
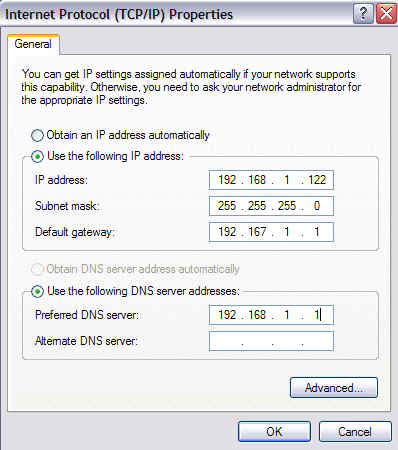
This is what it should look like when your done.
 |
|
Now your computer will always have the same IP
address.
You may need to restart you PC now - Do it anyway. |
|
| |
|
File Name: c:\DVR\wwwroot\screen320.html
Open this file with windows note pad.
Chang it from:
<html>
<head>
</head>
<body>
<table>
<tr>
<object id="WebDvr" classid="CLSID:9B6FBD9B-BD8E-4669-B4C3-1EEC540FE880"
codebase="http://<?SERVER
ADDRESS?>//WebDvr.cab#version=1,0,0,4"
width="320" height="240">
<param name="Address" "<?SERVER
ADDRESS?>">
<param name="Port" value="8013">
<param name="User" value="anonymous">
<param name="Password" value="">
<param name="DisplayMode" value="<?DisplayMode?>">
<param name="DisplayBlock" value="<?DisplayBlock?>">
</object>
</tr>
</table>
</body>
</html> |
| Change it to:
<html>
<head>
</head>
<body>
<table>
<tr>
<object id="WebDvr" classid="CLSID:9B6FBD9B-BD8E-4669-B4C3-1EEC540FE880"
codebase="http://192.168.1.122//WebDvr.cab#version=1,0,0,4"
width="320" height="240">
<param name="Address" value="192.168.1.122">
<param name="Port" value="8013">
<param name="User" value="anonymous">
<param name="Password" value="">
<param name="DisplayMode" value="<?DisplayMode?>">
<param name="DisplayBlock" value="<?DisplayBlock?>">
</object>
</tr>
</table>
</body>
</html>
Save the file. Now you should be able to use IE to watch your
cameras from with in the network.
You would type http://192.168.1.122 |

![]()
