| Getting the information that we need: |
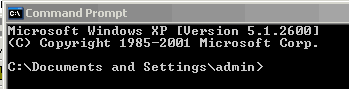
Click on START then RUN then type CMD in the
box that pops up and click OK.
When you click on OK you should see something similar to this:
In this box type IPCONFIG then press ENTER.
You should see information similar to this:
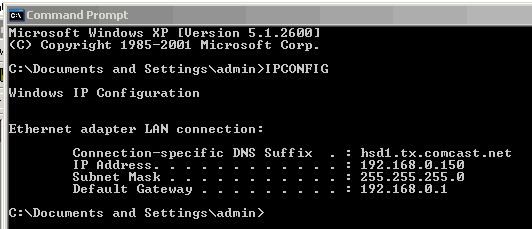
Write down the IP Address. Here it's 192.168.0.150
Write down the Subnet Mask. Here it's 255.255.255.0
Write down the Default Gateway. Here it's 192.168.0.1
Now type EXIT, this will make the command prompt box close /
Go away.
|
Now click on START then CONTROL PANEL
then Network Connections  |
Now you should see something like this: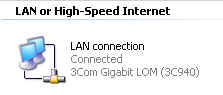 |
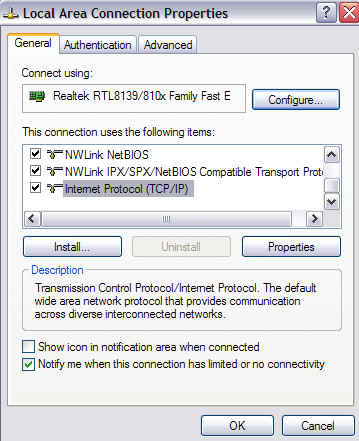
| Right click on the LAN connection icon then
select the Properties option. |
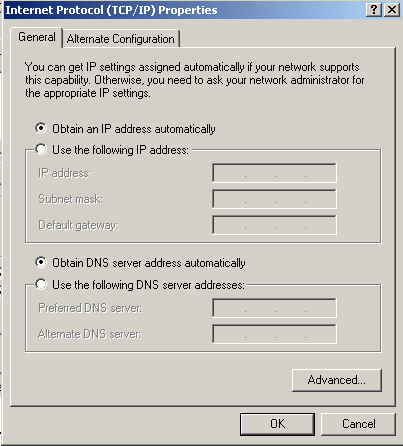
Now you should see a screen similar to this:
Using the scroll bar on the right side, scroll down until you see
the INTERNET PROTOCOL (TCP/IP)
Highlight it with your left mouse button then click on the Properties
button.
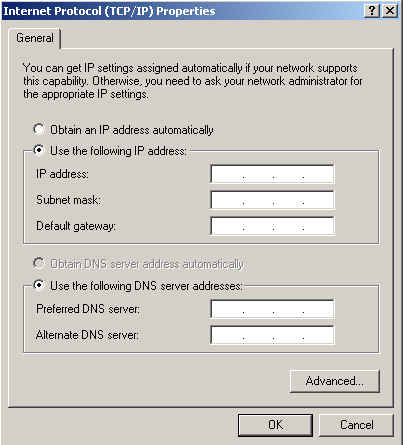
You should see something like this:
You need to change it to look like this:
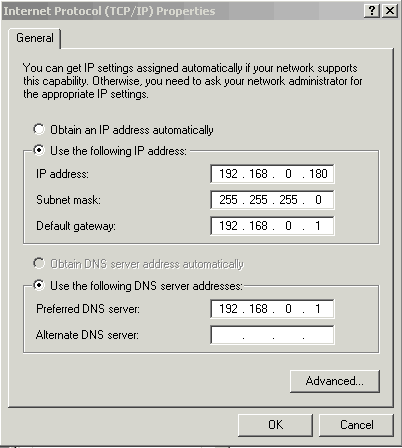
Now we are going to use the information that you wrote down.
In this example we would have wrote down 192.168.0.150
In the IP Address field above type in 192.168.0.180, this is going
to be the IP address from now on.
In the Subnet mask field, put in the Subnet mask that you wrote
down. 255.255.255.0
In the Default gateway filed, put in the information that you wrote
down. 192.168.0.1
The preferred DNS Server is the same as the Default gateway,
192.168.0.1
It should look similar to this:
Click OK, then Close. |
Now your computers local IP address will always be
192.168.0.180, It should never change.
You may need to restart your computer.
|
File Name: c:\DVR\wwwroot\screen320.html
Open this file with windows note pad.
Chang it from:
<html>
<head>
</head>
<body>
<table>
<tr>
<object id="WebDvr" classid="CLSID:9B6FBD9B-BD8E-4669-B4C3-1EEC540FE880"
codebase="http://<?SERVER
ADDRESS?>//WebDvr.cab#version=1,0,0,4"
width="320" height="240">
<param name="Address" "<?SERVER
ADDRESS?>">
<param name="Port" value="8013">
<param name="User" value="anonymous">
<param name="Password" value="">
<param name="DisplayMode" value="<?DisplayMode?>">
<param name="DisplayBlock" value="<?DisplayBlock?>">
</object>
</tr>
</table>
</body>
</html> |
| Change it to:
<html>
<head>
</head>
<body>
<table>
<tr>
<object id="WebDvr" classid="CLSID:9B6FBD9B-BD8E-4669-B4C3-1EEC540FE880"
codebase="http://192.168.1.122//WebDvr.cab#version=1,0,0,4"
width="320" height="240">
<param name="Address" value="192.168.1.122">
<param name="Port" value="8013">
<param name="User" value="anonymous">
<param name="Password" value="">
<param name="DisplayMode" value="<?DisplayMode?>">
<param name="DisplayBlock" value="<?DisplayBlock?>">
</object>
</tr>
</table>
</body>
</html>
Save the file. Now you should be able to use IE to watch your
cameras from with in the network.
You would type http://192.168.1.122 |
